
So in my last post HERE, I told you about how I decided to add boxes to my walls and go from this...
To this...
And I did it all by myself! Even better! :) So here is what I did…
 |
| *yawn* |
To this...
 |
| *KA-POW!* |
And I did it all by myself! Even better! :) So here is what I did…
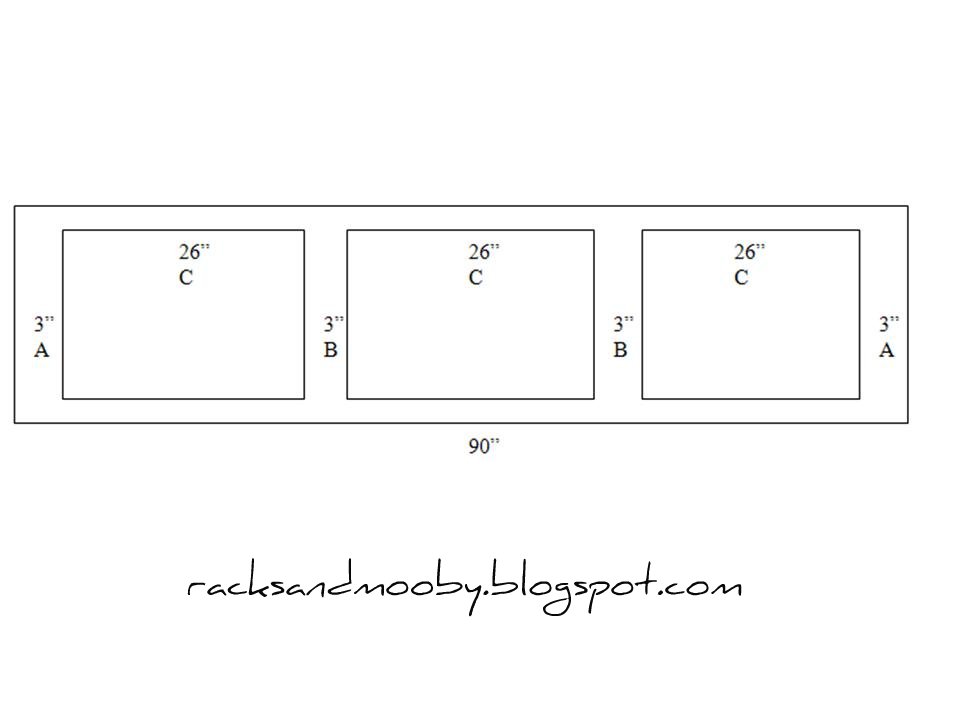
First, I decided which walls I wanted to add the boxes to and measured the length of each one. Next I needed to determine how many boxes I would put on each wall (this wasn’t so difficult – sometimes it was pretty obvious – um, one! Duh! LOL) and how big the boxes would be (this was the tougher part!).
I knew I wanted to have 3” borders around my boxes (the research I did indicated borders on boxes like these are typically either 3” or 6” – but obviously you can do whatever you want!), so this is when I had to break out the math skills. {see, I knew those letters after my name would come in handy after all!}.
I knew I wanted to have 3” borders around my boxes (the research I did indicated borders on boxes like these are typically either 3” or 6” – but obviously you can do whatever you want!), so this is when I had to break out the math skills. {see, I knew those letters after my name would come in handy after all!}.
Here is an example…My first wall was 90” long so I subtracted 6” to account for a 3” border on each end (A). This left me with an area 84” wide (90”-3”-3”) to fit in some boxes.

I decided that putting only two boxes in that space would result in some really long boxes (just not the look I wanted) so I decided to go with three boxes. From my remaining 84” I then subtracted another 6” to account for the 3” borders in between the three boxes (B).

This left me with 78” for my three boxes (84”-3”-3”). I divided the 78” of box space by 3 to come up with boxes that were 26” wide (C).
 |
To figure out the height of the boxes, I simply measured from the bottom of the chair rail to the top of the base board and then subtracted 6” (for a 3” border on the top and 3” border on the bottom). {Note: I will note here that I later realized that neither the chair rail nor the base boards were exactly level all the way across which led to slightly different heights along each wall. However, none of the differences were material enough to really be that noticeable so I just cut all of my heights the same. I knew it would be much easier to take this approach and just deal with the very slight differences. Besides, imperfection = “character”, right?!? ;}
Once I had all my measurements penciled out on paper, I wanted to be sure that I would like the layout/sizes of the boxes. So I took some masking tape and my tape measure and roughed out the look of the boxes on the walls.
Thankfully, the Heela (and my folks who were visiting at the time) all agreed that they looked good. So, I set off to Lowes to buy the makings for the boxes.
Stay tuned for the rest of the story... :)
**You can see the rest of this series here:
Part 1 - Idea
Part 3 - Cutting
Part 4 - Assembly
 |
| Masking tape helped me visualize how my boxes would look. |
Thankfully, the Heela (and my folks who were visiting at the time) all agreed that they looked good. So, I set off to Lowes to buy the makings for the boxes.
Stay tuned for the rest of the story... :)
**You can see the rest of this series here:
Part 1 - Idea
Part 3 - Cutting
Part 4 - Assembly


I love it! You did a great job!!
ReplyDelete